Friday, February 27, 2015

Fury a Movie Review

I am not much of a movie goer, I just don't make it to the theater that often so I missed Fury in Theaters and only recently saw it via Netflix were I get most of my movies.
A lot of people I know had enjoyed the movie(with some technical quibbles)  and I was eager to see it.   The movie start with us in side the tank Fury and Easy 8 type Sherman under the comand of a tough as nails Sargent with the Nome de Gerre of "War Daddy" played by Brad Pitt.  They just lost their assistant driver/bow gunner.  The crew has been together since 1942 when they went ashore in Africa in operation Torch.  They manage to get the tank running again and head back to base.  There we meet the replacement Norm who is trained as a clerk.  We also meet several other grizzled Sargent and a young lieutenant who probably graduated from West Point or OCS about the same time these guys arrived in Europe.  They have a mission to go join up with Baker company (an infantry unit) and on the way the LT and his tank get knocked off).

Once they find Baker company we meet my favorite supporting character Captain Waggoner this guy is the image of war weary but determined infantry officer he feels like he has his own movie that just happens to intersect with this one(and its one I want to see!). He has a platoon that is pinned down and needs support he sends War Daddy and his tanks out to save the men.  When War Daddy looks a the map and purposes an alternate route Waggoner says ".. You can ride on a fucking magic carpet for all I care. I know who you are. I know you know what you're doing. You just paste them hard for me. They murdered some good boys out there today. "
Thus starts the best part of the film the Tanks rescue the infantry and together they take out a defensive line of AT guns and MGs then they move into the town and working together clear the town of resistance street by street.  The tactics used seem very realistic  Along the way Norm has to be broken in a process that War Daddy does in non-too-gentle a fashion but by the end he clearly  is on his way to being part of the team.

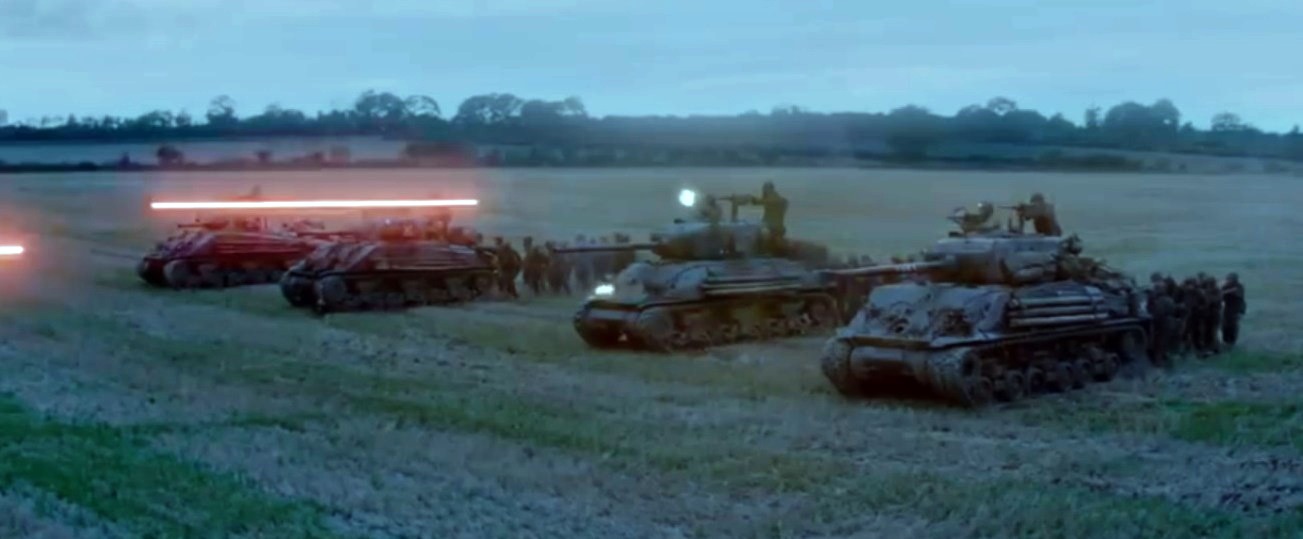
We then have a brief interlude as the crew over nights in the now captured town. Next Morning Waggoner send War Daddy and his tanks off to hold a cross road that "some troops are approaching."  He doesn't know how many or what they have but its critically important they hold the cross roads because a Germans could make it through and kill lots of allied support personal.   The tanks go off alone which is inexcusably stupid from a tactical stand point in 1945.
Along the way the encounter a Tiger I and this tank takes out every US tank but Fury in a the fight. The results are bit of stretch but the tactics could have been lifted from Flames of War the US tanks use smoke then charge and go for flank shots.  Furry is left alone to continue the mission...

They reach the cross roads and then hit a mine... knocking off a track and immobilizing them just on top of the cross roads.  At this point the story goes off the rails.  They send Norman off to a high point to watch the approaches while the rest of them try to repair the track, so far so good.  Then when Norman comes pelting back down the road at twilight with the news that two to three hundred SS infantry are on their way the only sensible move is to grab hand weapons, toss a grenade in the ammo box of the Tank and get the hell out of there.  They don't have a radio (it was knocked out in the fight with the Tiger) and if holding a cross roads with 4 tanks by them selves is a bit silly, trying to hold it with one broken one is suicidal and no soldier would tell them to do it. They ought to run but this is Hollywood so they don't they fight it out OK if they don't we have a sort of disappointing movie if our heroes are not heroic and there are all those defenseless rear area troops to worry about. That said this suicide last stand sort of undermines War Daddy's motivation, state earlier in the film, to get his crew through the war alive...

The problem is both sides fight stupidly (OK if you accept the tank crew should stay in this situation they fight their damaged tank really well) and after the clever tactical move we saw earlier int he movie at least one side should be smart about this. The other problem with this fight is the SS after initially being surprised by the torrent of fire coming from what they believe was a busted and abandon tank behave in an absolutely stupid manner they attack the tank in human waves (lots of them get killed) then they try sneaking down the side of the road and hitting the tank with Panzer Faust, but they do it close to the tank on the road when they have woods and field on either side of the road to work with. That kills one crew man.  At no point do they do the logical thing and just go around the immobile tank swinging wide in the dark!

The scene is still visually stunning and the acting feels very real.  You can see each man think it over and decide to stay, go down fighting you feel each death its powerful, its gut wrenching and I at least couldn't help thinking 'they all knew better'.   Norm survives by slipping under the tank through the escape hatch and is rescued the next day by infantry... so I guess there really was something between Furry and all those rear area troops.

I loved the first say 2/3rds of the film but the last part nearly ruined it for me.  See the movie for the first part and then forget what ever you know about tactics and common sense and enjoy the explosions and gun fire at the end if you can.

Wednesday, February 25, 2015

Flames of War Mid War Tourney at the Whiz (2/21/15)

Saturday my Fiancee was off to Newport RI for a bridal show with her girlfriends so I went to the Whiz and took part in a mid war tournament (yes it was a busy weekend). 

Game 1

Game one was against Mike and his Fallschirmjagers I lost the roll so my US infantry got to defend in a hasty attack scenario. 
You can see both deployments above.  I had to defend a long line while Rob was weighting his attack on my right. I had some depth on that side because I deployed half my HMG platoon out on that side.
A platoon of FJs and FJ pioneers on the right
The other platoon of FJ's was in the center left and could swing to join the attack on the right or advance on its own.
No kills but my Artillery would be pined an remain so for a few turns.
My HMGs send fire up the road we get a kill or two and get the FJs to hide in the woods.
Mike was very respect ful of my HMGs especially when the Sherman tanks arrived form reserve and tolled up on their flank.
One Sshurman was hit and kill by Mike's Maraurders but my own fire took them out in turn.
The then swung to the left to keep the JFs heads down and to get out of the way of an on coming Tiger
Here come the Pioneers!
Artillery finds the Shermans and takes out one.
My MGs face assault by JF and pioneers and are overwhelmed.
My tanks don;t do so well when assaulted in their turn but two survive and even pass moral..
Armored cavalry and TDs cam in on the far side of the bard (darn scattered reserves) so I use them to threaten Mike's objective.
Mike ends the game contesting the objective but we time out and by scenario rules having held my own objective I have the win 5-3.

Game 2 
My second game was on the desert table facing James and his British Motor Infantry.  The US infantry  really doesn't stack up well against it UK counter parts IMHO and James is a good player so I had a bad feeling on this one.  the Scenario was fighting withdrawal and I was the attacker 
I made a key error on deployment I should have put my cavalry recon and TD security secion on the right hand side but put them on the left flank instead.
Even so my Cavalry got around the flank and took out a 25 pounder and its staff team but then Jams was able to concentrate fire on my units and even destroyed my security section in a spot where I could not deploy the TDs.  To make matters worse James was able to withdraw platoon after platoon just as I had taken them down to the point were I might destroy them.
My Sherman made a last forlorn hope attack and almost took an objective but British infantry with sticky bombs took them out an the survivors fled. I extended my had to congratulate James on a flawless victory. I lot this one 1 to 7

Game 3
This time I was paired off against Nick and his Soviet Militia company a huge force of infantry in the free for all game.  Technically I was the attacker but it hardly matters in free for all. 
I sent tanks running up the flank using cover and got one T-34 I also ran recon up the  left flank and let his infantry have it with massed MG fire.
Nick had a huge wave of humanity advancing on the center...
and right flank were he got an early lucky kill on my HMG teams with his Katyusha rockets. I had better than deserved luck on the left killing quite a number of infantry defending the left flank objective on Nick's side.
This forced him bring his T34s back to help out...
My men made short work of them though my Tank destroyers were taken out by the lone survive of that platoon.
Nick was able to drive back my front line of infantry in the woods using weight of numbers but I had a buffer zone so my objectives were safe.  I was able to assault and drive off his troops on the left flank giving me a 5-3 win just as time expires because Nick graciously skipped one of his turns (he was at least two turns from any of my objective and we had mere minutes left in this round and Nick felt I had earned victory) and I am very grateful to him .

Tuesday, February 24, 2015

Flames of War with NHWGA

Last Thursday I made my way to the Relentless Dragon and set up this small Tunisian Vineyard town. This was a hold the line scenario German Armor against US armored rifles.
With two avenues of attack I decided to put pressure on both flank but weight my attack on he right opening with an artillery barrage.
Panzer IVs and Panzer IIs lead the way the latter lift gone to ground and then commence direct fire with 2cm and 7.5cm guns.
Over a couple of turns the firing is good enough to seriously cut down on the Yankees.
This assault was in fact unnecessary as they platoon broke and ran.
infantry assault on the left as well!
Also successful in driving the Americans back and my Panzers race for the right side objective.
But the M10s arrive and take out two of my Panzers!
The fire fight is fast and deadly have the objective but...
priests come on and pop more of my panzers
We end with both sides thin on troops and contesting the objective

Challenge Entry15mm ACW Dismounted Cavalry


These are Bluemoon 18mm figures that will serve as my dismounted cavalry troops for my Union Longstreet Army.


The troops have too many men using pistols for my taste but they do make it easy to see which unit is dismounted cavalry and who is infantry.


The Bugler with his yellow lace tunic was a bit hard to get right but really looks cool.


The color guards bearers are carrying flags from four States.


Pennsylvania


Rhode Island (this one will also work as a good generic flag)


This is the guidon of a Massachusetts Cavalry regiment


This butterfly flag is for a New Jersey regiment its a rather interesting embalm for a military unit. The 3rd New Jersey was a rare "Hussar" regiment named the Butterflies by the rest of the army when they joined it in 1864.  Rather than take offence the men apparently adopted the name as their own. 

Monday, February 23, 2015

Relief of Valdi Total Con 2015

Total Con was over the weekend, in the past Jon (or War Games Recon) Adrian and Cortland had put together historical miniatures games but as these fine fellows would be unable to make it I took up the torch to represent miniature games of a historical flavor.  I did this with a twist pitting the Grand Duchy of D'Argent against the Ostern Reich two Imagi-Nations of my own creation. The Duke is trying to drive off Ostern Forces from the key city of Valdi which has been besieged for several weeks. 
The Army of D'Argent arrayed for battle Light Cavalry on the left, Skirmish infantry on the right with D'Argent's small corps of heavy cavalry to their left.  The Duke's superb infantry is in the center backed by two battalions of Irish and Scottish exiles/mercenaries.
The Ostern forces have thrown up some defensive works and deployed artillery.  Skirmish infantry and Hussars can be seen in the for ground with Winged Hussar lancers in the center by the hill.  Beyond the hill the Reich Brigade hold another.
Both side had a poor showing command roll wise first turn (this was true for several turn I was very glad I made the D'Argent infantry Reliable to facilitate both sides getting into the action) with the exception of the Duke's line cavalry who got three moves and were right in the face of the Ostern light forces.

They took some hits form artillery and musket fire but soon drove the Grenzers back and were engaged with the Hussars beyond.

The Ostern Troops were not idle however (though the troops to the rear did have trouble getting up due to poor command rolls) The Cheveliers D"Argent(to the rear)  were soon overwhelmed by the on rushing Lancers of Rakowski's brigade (note pennants on lances) .  Prince William's cavalry found it self badly  entangled with two units of light infantry(for ground) while Jeavons' Horse grenadiers threw back Ostern Hussars in the center.
Alas the Cheveliers broke and the Prince Willim's men fell back from the cross fire leaving  Jeavon's men exposed.
The infantry was moving into position however and the Light Cavalry can be seen racing around the flank at the top of the picture.
 Jenvon's men were broken and scattered trying to return to the main line of D'Argent Cavalry but did manage to hurt one of the Lancers badly enough to sake it. Musket fire saw to the other regiment of Lancers, and the Ostern light cavalry were both broken though they took the line cavalry of D'Argent with them.   More Ostren Heavy cavalry appear along with infantry to shore up the wavering left flank. Sal the the Ostern general while concerned over the breaking of 2 brigades felt he had gotten good coin for the blood spilled.
The D'Argent light cavalry takes position on the flank of Lords Brigade of the Ostern army and opens up with carbine fire.
In the center a lone regiment of Heavy cavalry charges the Guard D'Argent. The fight is a dead lock.
D'Argents infantry closes on its objective the fortified line of hills.  Ostern Cavalry is fails to charge (other then the exception noted above).
On the left D'Argents light troops including the Jager-hounds are pressing the Ostern left flank. The hounds charge first one, then a second and finally a third Grenzer regiment.  The hounds tear at the flesh of the their foes and sew chaos on the left... the Light infantry is broken.
Ostern Cavalry charge up the gut supporting the lone unit the had attacked the guard. The Guard itself is forced to fall back but other unit hold.
The Charge if not quite as successful as hoped buys time for Ostern Infantry to advance to fill the now empty fortification...if they can make it in time. 
D'Argent presses on both flanks the light cavalry and Regiment DeBurre launch a coordinated assault on the right flank with the artillery pounding both the hill top guns and infantry. Much damage is done but no units break though several are just hanging on
D'Argent wins the race to the forts but cannot force the Cavalry to break off though this Ostern Currasiers and Dragoons are badly cut off they continue the melee.   At this point time is up as the convention is ending.  Discussing it with both Sal (the Ostern commander) and Lou (the D'Argent commander) we rule this a minor victory for the Ostern Empire.  D'Argent only had one brigade broken but had not taken the main hill fort.  The Siege would continue though the Ostern lines of supply were still threatened even if their siege lines were safe for now.

Thanks to both my players, I apologize if I didn't get your names right (I failed to write them down, please do correct me) and a Special thanks to Mark D'Errico who made up some emergency Disorder and Shaken tokens.

I made a few changes to the  Black Powder rules. 1st I gave each infantry unit 4 dice for firing, I don't think this made them much more deadly but it was easier for most of the player to remember 4 bases=4 dice.  2nd I created a new stat called Discipline that was mostly a save vs. Disorder this meant units could still become disordered but that it didn't happen on every 6.  Finally I also let commanders keep giving orders to their brigades if they failed an individual unit command roll but at a minus 1 per failed roll and this seemed to work well.